Monday, December 31, 2012

Braised Lamb Shanks

My last post for the year ...  

Happy 2013 !


Ingredients:

6 lamb shanks 
2 pcs  streaky bacon, cut into pieces 
2 large onions, chopped
6 cloves garlic, minced
3 celery stalks, cut into chunks

3 carrots, cut into chunks
4 potatoes, cut into chunks

1 small red capsicum, cut into chunks
2 ½ cups beef/chicken stock
2 cup red wine
2 tbsp tomato paste
1 cup passata

2 tbsp balsamic vinegar 
½  tbsp brown sugar (or white sugar)
1 tbsp worcestershire sauce

4 sprigs rosemary
salt & black pepper, to taste
olive
1 tbsp butter


  • Season lamb shanks with ground black pepper and salt.
  • Heat a frying pan until hot; add about 1 tbsp olive oil to the pan.  Fry the lamb shanks until browned all over.  Remove from the pan and arrange on a large ovenproof casserole dish.  
  • Fry bacon pieces until brown.  Transfer into the casserole dish together with the lamb shanks.
  • Add about 1 tbsp olive oil and butter to the pan and saute onion and garlic until just softened (not browned).  Add in all the vegetables and fry for about 2 minutes.  Transfer into the casserole dish.
  • Deglaze the pan with wine.  Pour in stock, passata, tomato paste, balsamic vinegar and worcestershire sauce.  Bring to the boil and season with brown sugar, salt and pepper.  Pour over the lamb shanks and vegetables and place rosemary sprigs on top.  Cover the casserole dish with a tight fitting lid.
  • Cook in a preheated oven at 160°C for about 3 hours or until lamb is tender and falling off the bone.
  • Remove the lid and sprigs of rosemary.  
  • Carefully transfer the lamb shanks onto a warm serving platter.  
  • Blend the vegetables and the juice together.  Pour the thick gravy over the lamb shanks and serve with mashed potatoes and green vegetables of your choice. 


Saturday, December 22, 2012

The Liebster Blog Award


I am truly honoured to be nominated for the Liebster Blog award by Chloe & Sarah of the wonderful blog, Honey & Lulu.  This is my very first award and with Christmas just around the corner, this feels like a fabulous Christmas gift for Minty's Kitchen.  A huge thank you  to Chloe & Sarah for the nomination.


Liebster is a German word and it means dearest or favourite.  The significance of this award is to bring more attention to your favourite blogs with fewer than 200 followers, who deserve to have more recognition and followers than they already have.  In other words, it is like a chain letters of love for baby-bloggers.  


The rules to accepting this award:
  • Add the award icon to your blog
  • Link to your nominator to say thank you
  • Answer the questions the nominator has set for you, and create 11 questions for your own nominees to answer
  • Choose 11 bloggers with less than 200 followers, go to their blog and tell them about the award

Questions from Chloe & Sarah
  • Summer or winter?   Winter, defintely
  • What's your all-time favourite movie?  You've Got Mail
  • Facebook or Twitter?  Facebook
  • New York, Paris or London?  Paris
  • What's your favourite Christmas carol?  Silent Night
  • Which iPhone app do you use most often?  None - doesn't own an iPhone
  • Breakfast,  lunch or dinner?  Dinner
  • What's your favourite holiday destination?  Somewhere serene
  • Online shopping or offline shopping?  Offline shopping
  • What's your favourite lifestyle brand?  No specific brand
  • Black & white, or colour photography?  Black & white


My questions for the nominees:
  1. Entree, Main or dessert
  2. Your favourite dessert 
  3. Your favourite cookbook
  4. Your favourite junk food
  5. Who inspires you the most in cooking
  6. Your favourite part of blogging 
  7. Your favourite dish
  8. What/who inspired you to start your blog
  9. Favourite time of the day
  10. If you were to have your last meal, what would it be
  11. Your must-have pantry items

As part of the rules, I would like to nominate the Liebster Blog Award to:
  1. Helena's Kitchen
  2. Kingdom of Tasty Life
  3. Away Of Mind
  4. Through The Kitchen Door
  5. Yummy Bakes
  6. Butter, Flour & Me
  7. Veronica's Kitchen
  8. My Little Favourite DIY
  9. Chef and Sommelier
  10. Jess Kitchen
  11. Everybody Eats Well in Flanders


Congratulations to the deserving nominees!   The creators behind these fantastic blogs are inspiring and talented.  

I would also like to take this opportunity to thank my blog followers and those who drop by and leaving valuable comments and kind words. 


Wishing all of you a very Merry Christmas and Happy 2013  !


Monday, December 17, 2012

Christmas Tree Buns


Bread recipe adapted from Jocelyn's 蛋白土司 


When I saw  Jessie  and  Min  posted their beautiful Christmas Tree Bread, I decided that I must post one too to thank my fellow blogger friends who so kindly shared their wonderful creations and readers who dropped by my humble blog.  

Wishing you all a merry Christmas and may the good times and treasures of the present become the golden memories of tomorrow!


Ingredients:

220g bread flour
80g plain flour
20g caster sugar
2 tsp active dried yeast
1/4 tsp salt
130g plain yoghurt
80g egg whites
45g olive oil

grated tasty cheese
dried cranberries
dried parsley


  • In a mixer fitted with a dough hook, combine flours, sugar and  yeast together.  Add in the yoghurt and egg whites to form into a slightly sticky soft dough.  Add in salt and continue to knead until smooth and elastic (about 10 minutes).
  • Add in olive oil and continue to knead until fully incorporated.  
    [At this stage, the dough should be able to stretched to form a window-like thin membrane without breaking].
  • Shape the dough  into a smooth ball and place in a greased  bowl.  Cover with lightly oiled clingfilm.  Then place it in a warm, moist and draught-free place to allow the dough to rise until at least double or nearly triple its original size.
    [To determine if the dough has risen long enough, poke a floured finger into the  dough.  When you remove your finger, the dough shouldn't spring back at all.  If the dough springs back immediately, it is underproved and needs more time to proof further.]
  • Once the dough has doubled in size, punch down by pressing the dough out evenly with your hands to remove air bubbles.
  • Divide the dough into:
    - 1 x 50g and 10 x 30g  [for bigger tree]  and
    - 1 x 30g and 10 x 20g  [for smaller tree]
    Roll them into balls and rest for 10 minutes.
  • Arrange the buns on a lined baking pan, using the 50g and 30g as tree trunks.  Cover with lightly oiled clingfilm.  For final proofing, leave them to rise in a warm place until they nearly doubled in size.
  • Preheat oven to 170 degrees C.
  • Brush the loaves with egg-wash and sprinkle some grated tasty cheese, chopped dried cranberries and  dried parsley on top.
  • Bake for about 15 minutes or golden brown.
  • Dust with icing sugar before serving.


Saturday, December 15, 2012

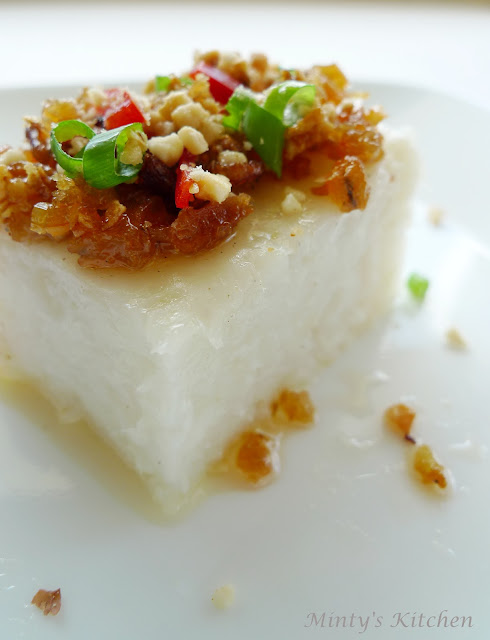
Steamed Daikon Cake (蘿蔔糕)


The word Daikon actually comes from two Japanese words: dai (meaning large) and kon (meaning root). Also known as radish or white carrot.

This is a different version from my previous Steamed Radish Cake where everything was mixed together and then steamed.  Today I decided to make a plain steamed daikon/radish cake with toppings added before serving. 


Ingredients:

750g coarsely grated daikon/radish
100 ml water

Seasoning:
1 tsp sesame oil
1/2 tsp chicken granules
2 tsp salt
1 tbsp sugar
pepper

Batter:
200g rice flour
20g wheat starch
20g corn starch
550ml water


Toppings:
100g dried shrimps, washed and chopped
5 cloves garlic, finely minced
4 shallots, sliced
oil (about 2 tbsp)
pounded peanuts
spring onions for garnishing

  • Cook grated daikon with 100ml water in a pot over low fire until daikon turns translucent (about 10 - 15 minutes).  Set aside to cool. Squeeze out excess water from the daikon.  Set aside.
  • In a mixing bowl, combine all the ingredients for the batter.   Stir to ensure there are no lumps in the mixture.  Then add in seasoning and stir well to combine. Place the bowl over boiling water and cook until mixture thickens.  Add in the cooked daikon and mix well.  Transfer batter into a 24cm greased pan; level the surface.  Steam over high heat for about 50 minutes or until cooked.  (There will be liquid on the surface, just leave it as it will be absorbed as the cake cools and prevents the surface from drying out).
  • Meanwhile, to prepare the toppings - heat oil in a frying pan and saute shallots and garlic until fragrant; remove from pan.  Then lightly fry dried shrimps.  Mix in the sauteed shallots and garlic.  Set aside. 
  • To serve, sprinkle daikon cake with toppings. 

Wednesday, December 12, 2012

Kimchi (Repost)


[Some changes I've made on my previous post Kim Chi]


Ingredients:

1kg napa cabbage, cut into big pieces
3 carrot, cut into sticks
1 daikon, cut into sticks
1/2 cup sea salt dissolved in 1 cup of warm water
enough cold water to cover all the vegetables
1 cup red chilli flakes/chilli powder
4 cloves garlic
1 knob ginger
1/2 small brown onion
1 ripe Packham pear (peeled and cut into chunks)
1 ripe apple (peeled and cut into chunks)
1/4 cup fish sauce (to taste)
5 tbsp sugar (to taste)
salt to taste
3 spring onions, sliced
glutinous rice paste (optional. This rice paste is to speed up the fermentation process)

To make the glutinous rice paste:   Cook 1 tbsp glutinous rice flour with 1/2 cup water  over low heat until the mixture has thickened and turned white and bubbly.

  • Dissolve the sea salt in warm water and add in the cold water.  Stir well.
  • Place cabbage, carrots and daikon in a big mixing bowl and pour salt water over it.  Toss gently.  Leave vegetables in the brine for  about 3 hours, making sure that they are all fully submerged in the salt water.
  • Wash the vegetables  to rinse off excess salt.  Squeeze and drain well.  Transfer to a large mixing bowl.
  • Place pear, apple, onion, ginger, garlic, sugar and glutinous rice paste into a blender and blend until fine.  Then add in chilli flakes, salt, sugar and fish sauce.  Combine well.
  • Add sliced spring onions to the drained vegetables.  Pour in the blended paste and toss well.  
  • Once all the vegetables  have been coated, transfer to an airtight glass container and press down the vegetables.  Pour in the liquid as well.    (Do not fill right up to the rim).
  • Cover and store the Kim Chi  in a cool, dark place for 24 hours to stimulate the fermentation process.  Then refrigerate it.  Kim Chi keeps well in the refrigerator for 3 - 4 weeks.


Monday, December 10, 2012

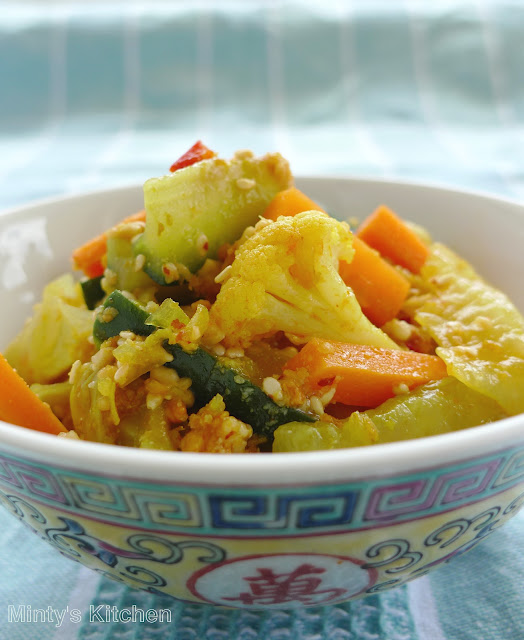
Acar


Ingredients:

1 kg cucumber (skin on, halved lengthwise and remove seeds and  cut into 3cm strips)
500g carrots (peeled and cut into 3cm strips)
800g cabbage (cut into chunky pieces)
600g cauliflower (cut into small florets)

'Blanching mixture':
800ml water
800ml white wine vinegar
4 tbsp salt
4 tbsp sugar 

Pounded ingredients:
10 shallots
10 cloves garlic
1pc belacan
thumbsized fresh tumeric
thumbsized fresh galangal
5 candlenuts
2 stalks lemongrass, sliced finely
2 tbsp hot chilli powder
100g dried shrimps (soak 10 min and drain - pounded)

Seasoning: (adjust quantity of ingredients to suit taste)
1 1/2 cup white wine vinegar
3 tbsp fish sauce
sugar
salt

roasted peanuts, pound
lightly roasted sesame seeds

  
  • Sprinkle  salt over cucumber slices.  Toss well.  Set aside for about 30 minutes. Rinse off the salt.  Squeeze out excess liquid.  Do the same with carrots. 
  • Bring 'blanching mixture' to the boil.  Blanch cabbage and cauliflower separately for about 15 seconds.  Drain well.
  • Heat oil in a wok and lightly fry the pounded dried shrimps.  Transfer into a bowl and set aside.  Add more oil into the wok and  fry the pounded ingredients until aromatic.  Stir in the pounded dried shrimps and seasoning.  Adjust the taste accordingly.  Bring to the boil.  Remove from heat and set aside to cool completely.
  • Add all vegetables into the wok and stir well.   Keep refrigerated.
  • Add in peanuts and sesame seeds before serving.
Note:  Acar  is best served the next day.  


Monday, December 3, 2012

Spicy Glutinous Rice Rolls (Rempah Udang)

A cheat's version of Rempah Udang ~


A very popular nyonya kuih which is known as Pulut Panggang, Rempah Udang or Lemper Udang - glutinous rice rolls filled  with spicy coconut and dried shrimps (or fresh prawns) wrapped in banana leaves and then grilled.  

For my convenience, I used sushi mould to make my rice rolls.  And since I didn't have any banana leaves, I just served them without grilling. However, nothing beats the traditional Rempah Udang as the grilled banana leaves impart a lovely fragrance. 


Ingredients:

Rice mixture:
400g glutinous rice, washed and drained
375ml coconut milk
1 tsp salt
1 tsp sugar
pandan leaves  (knotted)

 Filling:
100g dried shrimps, washed, drained and chopped finely
70g dessicated coconut, toasted and ground
1 cup coconut milk
Oil 

 Seasoning:
1/4 tsp salt
1/2 tsp sugar
dash of pepper
fish sauce (to taste)


Ground spices:
4 shallots
3 cloves garlic
1 stalk lemon grass, sliced
2 candlenuts
1 tsp chilli powder

  
  • Mix glutinous rice, coconut milk, salt and sugar together.  Put in pandan leaves. Steam for about 30 minutes until cooked.  Remove from steamer and set aside to cool.
  • Heat oil in a frying pan and lightly fry the dried shrimps until aromatic.  Set aside.
  • Fry the ground ingredients until fragrant.  Add in dried shrimps, ground dessicated coconut and seasoning followed by coconut milk.  Cook until dry.  Set aside.
  • Using sushi mould, press in glutinous rice and then put in filling.  Cover filling with more rice and press down firmly.  
  • Unmould the rice rolls and serve them on a plate.  


Saturday, December 1, 2012

Sago-Mango Pudding

A delightful dessert to welcome the first day of summer ~


(Makes 6 glasses of pudding)
Ingredients:

130g sago
300g mangoes, peeled and diced - puree
50g mangoes, peeled and cubed
150ml orange juice
450ml coconut milk
150ml evaporated milk
150g sugar
5 tsp gelatine + 2 tbsp cold water


  • Pour sago into boiling water.  Let it boil for about 5 - 7 minutes.  Turn off heat, cover the pan and set aside for 15 minutes.  Run cold water into the pan and stir.  Then drain in a sieve.
  • In a blender, puree diced mangoes with orange juice. 
  • Sprinkle gelatine over 2 tbsp of cold water and let it bloom.  Then dissolve the gelatine in the microwave oven for a few seconds.
  • Combine coconut milk and sugar in a saucepan.  Simmer gently until sugar dissolves. Add in gelatine mixture and stir to combine.  The pour in mango puree and evaporated milk.  Stir well.
  • Divide mango cubes into glasses and then fill up the glasses with pudding mixture. 
  • Place the glasses onto a tray.  Cover with cling wrap and refrigerate the pudding overnight to sets.
  • Serve cold and garnish with fresh fruits.


Related Posts Plugin for WordPress, Blogger...